Showing posts with label Underwood typewriter. Show all posts

Tuesday, May 22, 2018

Underwod No. 3 with a Serial Number Not to be Found

Styling like the later models, and my No. 5 and similar to my No. 6


Check it out. A number not of file that I can determine.
 I used some lumber chalk to fill in the numerals to be sure I did not miss anything. This number is not found until the Underwood No. 4 and No.5, and the number states 1916 a full 11 years before the 11 inch No. 3 was released.  This No. 3 also has the newer mainspring with the thumb knob tension adjustment like my No. 6 rather than the crank like my No. 5.

I'll be posting more on this when I get to cleaning and repairing it.   My first task is to read on how to remove the carriage to get the vibrator working and free the stuck ribbon selector.  Then I may take the front and margin bar apart to fix the bell.  The margin release works on this typewriter, but the bell does not.

Seems a bit of PB Blaster and a cleaning with carb cleaner has gotten all the keys working, and a bit of Liquid Wrench on the margin rail and some lube on the carriage rail has all of that working ok.

For now though I'm more curious when this was made since the number is 115894 higher than the last number made.  Looks like 14000 were made in the final year of production if the chart shows the final year of production.

It could be made in 1929, but that would then be a wide carriage.

Will Davis has a nice review of the differences in the No. 4 and 5 with one picture showing a No3 variant of the No. 5 but only with a 12 inch to 18 inch carriage, but with Underwood Standard Typewriter on the carriage which is different than my carriage and the Underwood Standard Typewriter below the space bar.

Does anyone know the URL for the mirror of Wills site that used to be on Alan Seaver's site because Will's link does not work and there is nothing on Alan's site.  I searched the Wayback Machine, but nothing was found there either.

Saturday, April 11, 2015

Replacing an Underwood Rhythm Touch (SS) Platen

This arrived in todays mail

In order to use what arrived today I first had to start here and remove it about a week or so ago.  Remove the two screws holding the cover and remove the cover.

The right knob gets removed first by loosening the two set screws.

Loosen the left screw

Loosen the right screw

Use a small screwdriver to hold back the ratchet dog from the line feed ratchet gear.  You can do it with just your fingers if you are brave enough should it slip and you get pinched.

Hold the platen with one hand and twist the shaft using the knob with your other hand while pulling on the knob at the same time.  The black knob not the variable spacer push button.  As you pull you will need to let go of the plaen and release the feed with a screwdriver until the gear passes.  Twist and pull on the line feed knob to help get the shaft out.  Also hold on to the little lever or it will fall. If it falls onto the work bench it will be fine. If it falls on the floor it may decide to hide from view.

This is the little lever that releases the feed dog.

This is where the semi-circular end rides

Original

Feed pressure rollers before removing to send off.  Also shown is the paper feed tray.  Note, every other metal section that fits under the paper tray has a rubber pad on it.

Last Saturday I took time to TRY my Oliver.  Also the Underwood skips when I bottom out the keys rather than properly press them.


The recovered platen

The recovered pressure rollers.  That is not a flat spot on the one small one.  It is a mark like a water mark.

The shaft and line feed are back together.  They go back to gether in reverse of taking them apart. 

The platen shaft has a flat for tightening the set screws against.  Align all the screws with the flat spot.

All finished in about 30 to 40 minutes including the time to take the photos.  After this photo was taken I rejuvenated the rollers on the paper bail and they are not so shiny any longer.

This is what the pressure rollers look like with the paper feed tray installed

This is what the paper feed rollers look like when the feed tray is removed.  The front rollers can be removed quite easily, but the larger ones under the paper tray take a bit if wiggling since they are spring loaded and fit quite tight.  All the rollers are easily removed by loosening the screws in the shaft collars. Note where and how the tiny rollers go on the front ones as they must be reassembled the same.

Not hollow ground, but quite useful around typewriters, especially loosening and tightening the right knob screws on this typewriter.
The two feed roller photos should be near the beginning.  I remembered to insert them too late.  Blogger is a pain to rearrange photos after insertion so they stay out of sequence.

I hope there is enough detail here to help anyone who wants to tackle an Underwood platen.  My 1941 M is the same as this 1947 SS.  I'm unsure how many others match.

Very highly recommended.
 http://www.jjshort.com/typewriter-platen-repair.php

Saturday, March 14, 2015

Underwood Master or Champion?


The post card and the image above I think originate in the New York Public Library.  They are all over  on line so I do not know who to correctly recognize as the originating source.

Mine, missing some chrome.
Here's the link to the one that has plastic keys.  The keys even look like they may be dark green.

I thought I may be able to differentiate between Master and Champion by the pull tab on the type slug access door.  Then I found some sites with Underwood Master shown without the pull tab.  I'm sure there are variations between model years, and maybe even production runs.  I'm wondering whether mine is a Master, as I found M to designate that, or was the space bar changed some time in its life, or is that normal for the Master to have CHAMPION on the space bar. Remember in all the typing contests Underwood won. 

Monday, March 9, 2015

Another Typewriter Joins the Staff at Work

Thought is best to use some engineering paper since I was at work in the lab.
I was thinking of my SS when I typed SS.  I meant model S.

Under the sheet of styrofoam was a few sheets of high density foam and the entire machine was packed nicely with it too.  The basket was filled with balled plastic grocery bags and the entire machine stabilized in its foam encasement.  Excellent work.
The machine as it sits on the back section of my desk.  Also the H3k stored away in its house.
Dates to 1940

Wish mine had the fancy paper tray that Robert Messenger's has.  Mine needs some chrome too.
I really enjoy using my Underwoods.  They are the best, snappiest, fastest, easiest typewriters in my collection.

Our engineer intern now wants a typewriter.  I think I'll see what I can find on the to-be-repaired stack for him.  I know I have at least one repairable H3k.

I'll be sending this platen off to JJ Short when the other one comes back.  I could save a few dollars if I'd waited until I got this one. 

Sunday, November 3, 2013

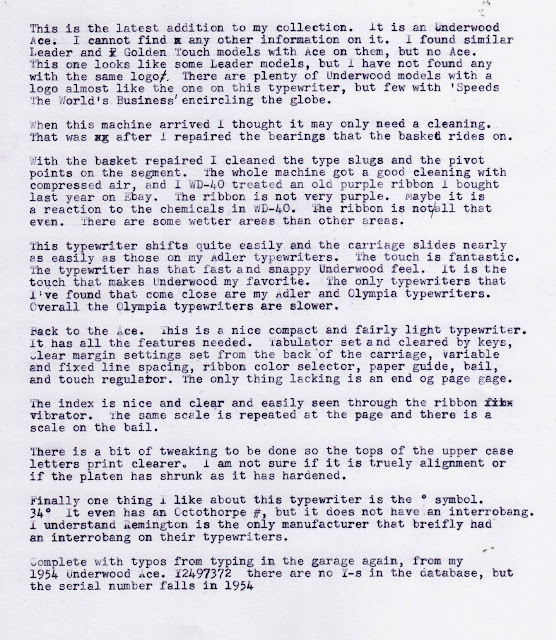
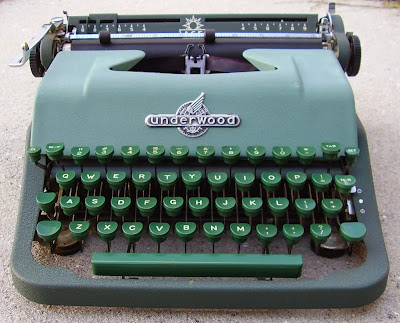
The Typewriter Behind the Logo


This typewriter was not all that dirty.


The type slugs were really filled with dirt, grime and old ink. The degree symbol must not have been used much as it was not filled with dirt.

pP, q, e, Dd, 9, g, etc. were especially filled.


The small keys on the very left and right of the top row are the TAB Clear and Set.


Margin settings are easily and clearly seen through the slots.  The left is not as visible in the photo as it is red.  I should have fill flashed it.

These are the margin stop setting buttons. They push in and slide.


With a bit more searching on line I found this page on Alan Seaver's Machines of Loving Grace.  It appears the Ace is a rebrand or different name for the same model.  I suspected Universal from looking at other typewriters and from what was on Will Davis's website and Alan's site I found a bit more information.

Scroll about half way down the page in the link to two newer brown and tan Underwood Ace typewriters.